Posts

Let's measure the distance using Ultrasonic Sensor

Image
INTRODUCTION This tutorial will browse you through connecting an Ultrasonic Sensor and measuring the distance  What is an Ultrasonic Sensor? An Ultrasonic sensor is a device that can measure the distance to an object by using sound waves. It measures distance by sending out a sound wave at a specific frequency and listening for that sound wave to bounce back. By recording the elapsed time between the sound wave being generated and the sound wave bouncing back, it is possible to calculate the distance between the sonar sensor and the object. Materials Required, Ultrasonic sensor, arduino board, 4 female to male jumper cables Arduino Uno Board (1x)  Ultrasonic Sensor (4x)  Female to Male Jumper Cables Ultrasonic Sensor Setup : Connect VCC on Ultrasonic Sensor to 5V pin on Arduino Board. Connect GND on Ultrasonic Sensor to GND pin on Arduino Board. Connect TRIG on Ultrasonic Sensor to pin 3 on Arduino Board. Connect ECHO on...
Switch ON/OFF LED via Bluetooth

Image
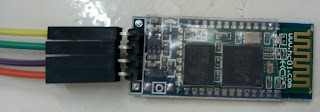
INTRODUCTION This tutorial will browse you through connecting an LED and controlling(On/Off) it via Bluetooth. Materials Required, Arduino Uno Board (1x) LED (1x) HC-05 or HC-06 Bluetooth Module Arduino terminal app  on Android  HC-06 Bluetooth Module Setup :  Connect VCC on HC-06 to 5V pin on Arduino Board. Connect GND on HC-06 to GND pin on Arduino Board. Connect TXD on HC-06 to TX pin on Arduino Board. Connect RXD on HC-06 to RX pin on Arduino Board. Connect positive pin on LED to pin 13 on the Arduino Board. Connect negative pin on LED to GND pin on the Arduino Board. Connect Arduino Board to PC via USB Upload the following code. Download Arduino Terminal app on Android Phone. Connect to HC-06 using  Arduino Terminal app . Enter 'n' to switch on LED. Enter 'f' to switch off LED. Arduino Code Connecting HC-06 Bluetooth Module to Arduino Uno Board Android Terminal Application

Installing and Programming Arduino

Image
INTRODUCTION This tutorial will walk you through downlaoding, installing and testing the Arduino IDE . Note : I'll be following the steps on how to install and test Arduino IDE with Windows operating system. Requirements :  A computer (Windows, Mac or Linux) An Arduino Board A USB A-to-B cable Installing Arduino IDE Windows 10 Download the latest Arduino IDE for Windows Scroll down to "Download the Arduino IDE" In your right hand side, press on "Windows Installer" Press on "Just Download" After completing the download, launch the .exe file While installing allow Administration Access "Yes" After a sucessful installation, double-click on the Arduino desktop icon. Testing your Arduino Board Note : I'll be following the steps on Arduino UNO board. Open installed Arduino IDE Plug in the Arduino UNO board via USB Go to : File > Examples > 01.Basics > Blink Select the type of th...

Arduino Family

Image
Arduino Uno  Great choice for your first Arduino. It has 14 digital input/ output pins, 6 analog inputs, a USB connection, a power jack, a reset button and more. Furthermore, contains everything needed to support the micro-controller. Simply connect it to a computer with a USB cable or power it with a AC- DC adapter or battery to get started.    Arduino UNO Arduino Mega UNO's big brother. It has 54 digital input/ output pins, 16 analog inputs, a USB connection, a power jack, and a reset button. As Arduino UNO, Mega contains everything needed to support the micro-controller. Simply connect it to a computer with a USB cable or power it with a AC- DC adapter or battery to get started. The large number of pins facilitates in handy for projects that require a bunch of digital inputs or outputs. Arduino Mega Arduino Leonardo First development board to use one micro-controller with a built-in USB. Cheaper and Simple. Board is handling ...

What is an Arduino?

Image
INTRODUCTION Arduino is an open-source platform used for building electronic projects. It consists of both a physical programmable circuit board, which is known as a Microcontroller and an IDE Arduino 1.8.2, which is used to write and upload computer code in to the physical board. Unlike previous programmable circuit boards, the Arduino does not need a seperate piece of hardware (called a programmer) in order to load the new code onto the board - you can use the USB cable. Furthermore, the Arduino IDE uses a simplified version of C++ which makes it easier for us to learn to program. Arduino UNO Arduino IDE (Version 1.8.2) WHAT'S ON THE BOARD? There are various Arduino Boards that can be used for different purposes. I've used the Arduino Uno board below, which is one of the most popular boards in the Arduino family and would be a great choice for a beginner. Power (USB Plug/ External Power Supply) ...